
@muiの「x-data-grid」でデータ(行)を追加するサンプルコードです。
ボタンを押すとデータ(行)が追加されます。
検証バージョン
- @emotion/react: 11.11.1
- @emotion/styled: 11.11.0
- @mui/material: 5.14.10
- @mui/x-data-grid: 6.15.0
- react: 18.2.0
- react-dom: 18.2.0
現段階ではreact:18.2.0では@muiとの依存関係でエラーが出るときもあるようです。
その場合はreact:17.0.2だと動くそうです。
Data Gridで表を作成
表を表示するコードのサンプルです、これに追加ボタンを実装します。
import * as React from 'react';
import Box from '@mui/material/Box';
import { DataGrid, jaJP } from '@mui/x-data-grid';

const dateFormat = (v) => new Date(v.value).toLocaleString('ja-JP', { dateStyle: 'long' });

const columns = [
  { field: 'name', headerName: '名前', width: 180 },
  { field: 'age', headerName: '年齢', type: 'number', width: 80 },
  { field: 'birthday', headerName: '誕生日', type: 'date', width: 200, valueFormatter: dateFormat },
  { field: 'isAdmin', headerName: '管理者', type: 'boolean', width: 80 },
];

const rows = [
  { id: 1, name: '1st', age:10 , birthday: '2023-08-04', isAdmin: false },
  { id: 2, name: '2nd', age:20 , birthday: '2021-02-02', isAdmin: true },
  { id: 3, name: '3rd', age:30 , birthday: '2020-03-03', isAdmin: false },
];

export default function DataGridDemo() {
  return (
    <Box sx={{ width: '700px' }}>
      <DataGrid
        columns={columns}
        rows={rows}
        localeText={jaJP.components.MuiDataGrid.defaultProps.localeText}
        autoHeight
      />
    </Box>
  );
}

追加ボタンと追加機能の実装
x-data-gridはapiRefを使用することで簡単にデータを操作することができます。
import * as React from 'react';
import Box from '@mui/material/Box';
import { DataGrid, jaJP, useGridApiRef } from '@mui/x-data-grid';
import { Button } from '@mui/material';

const dateFormat = (v) => new Date(v.value).toLocaleString('ja-JP', { dateStyle: 'long' });

const columns = [
  { field: 'name', headerName: '名前', width: 180 },
  { field: 'age', headerName: '年齢', type: 'number', width: 80 },
  { field: 'birthday', headerName: '誕生日', type: 'date', width: 200, valueFormatter: dateFormat },
  { field: 'isAdmin', headerName: '管理者', type: 'boolean', width: 80 },
];

const rows = [
  { id: 1, name: '1st', age:10 , birthday: '2023-08-04', isAdmin: false },
  { id: 2, name: '2nd', age:20 , birthday: '2021-02-02', isAdmin: true },
  { id: 3, name: '3rd', age:30 , birthday: '2020-03-03', isAdmin: false },
];

export default function DataGridDemo() {
  const apiRef = useGridApiRef();

  // データ(行)の追加
  const addRow = () => {
    const rowIds = apiRef.current.getAllRowIds();
    const newId = (rowIds.length == 0) ? 1 : Math.max(...rowIds) + 1; // 現在のidの一番大きな数字に+1する

    const addValue = { id: newId, name: `${newId}th`, age: 28 , birthday: '2023-09-13', isAdmin: false };
    apiRef.current.updateRows([addValue]);  // データを追加
  }

  return (
    <Box sx={{ width: '700px' }}>
      <Box component='div' sx={{ p: 2, textAlign: 'right' }}>
        <Button variant="contained" color='success' onClick={addRow}>追加</Button>
      </Box>
      <DataGrid
        apiRef={apiRef} // apiRefを追加
        columns={columns}
        rows={rows}
        localeText={jaJP.components.MuiDataGrid.defaultProps.localeText}
        autoHeight
      />
    </Box>
  );
}
apiRef.current.updateRows()は渡された値のidが存在しなければ追加します。
なので、追加するデータは今あるデータのidと被らない数字を付与する必要があります。
同じidのデータがある場合は更新となります。
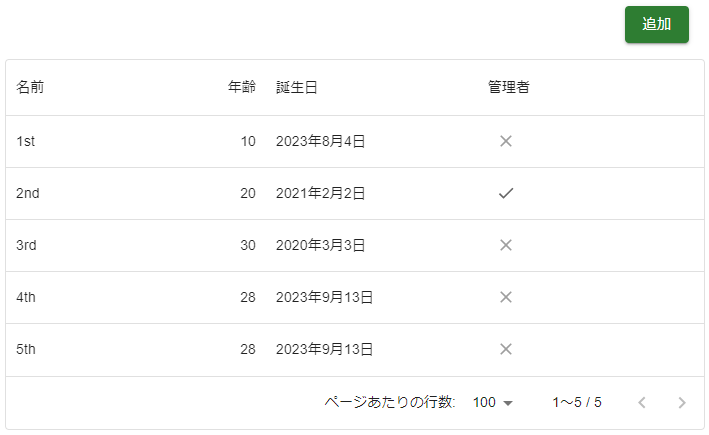
データ追加前

データ追加後
追加ボタンを押すとデータを追加できます。
まとめ
@mui/x-data-gridはapiRefが使用できるようになったので、@material-ui/data-gridより楽にコーディングできるようになりました。
有料版の@mui/x-data-grid-proや@mui/x-data-grid-premiumもありますが、ノーマルでもかなり優秀です。
今回は新しく追加するデータを固定にしているので、追加ボタンを押しても同じデータが追加されます。
フォームを作成して追加するデータは入力式にすれば任意のデータが追加できます。
DBでデータを管理する場合は追加ボタンを押した際にサーバへデータを送って登録が必要です。