
Material-UIの「Data Grid」でデータを更新するサンプルコードです。
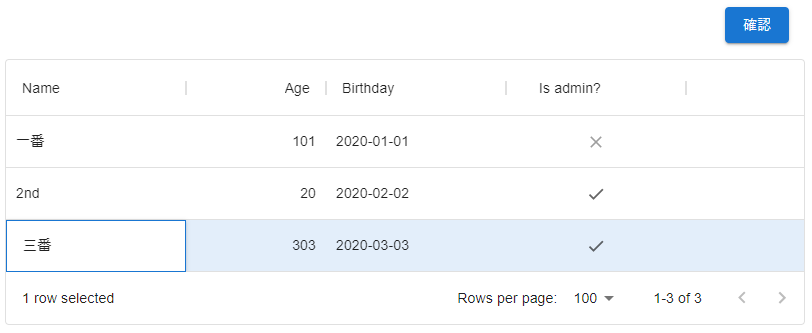
セルを一つずつ更新できます。
検証バージョン
- react: 17.0.2
- @material-ui/core: 5.0.0-beta.0
- @material-ui/data-grid: 4.0.0-alpha.35
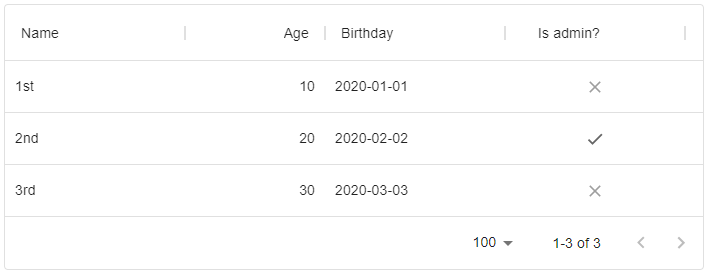
初期のData Gridコード
表を表示するだけのシンプルなコードです、これに更新機能を実装します。
import * as React from 'react';
import { DataGrid } from '@material-ui/data-grid';

const columns = [
  { field: 'name', headerName: 'Name', width: 180 },
  { field: 'age', headerName: 'Age', type: 'number', width: 140 },
  { field: 'birthday', headerName: 'Birthday', type: 'date', width: 180 },
  { field: 'isAdmin', headerName: 'Is admin?', type: 'boolean', width: 180 },
];

const rows = [
  { id: 1, name: '1st', age:10 , birthday: '2020-01-01', isAdmin: false },
  { id: 2, name: '2nd', age:20 , birthday: '2020-02-02', isAdmin: true },
  { id: 3, name: '3rd', age:30 , birthday: '2020-03-03', isAdmin: false },
];

const DataGridTest = () => {
  return (
    <div style={{ width: '700px' }}>
      <DataGrid
        columns={columns}
        rows={rows}
        autoHeight
      />
    </div>
  );
}
export default DataGridTest;
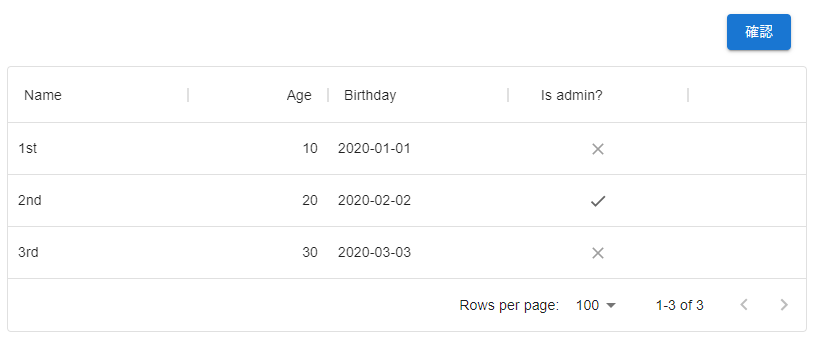
更新機能の実装
import * as React from 'react';
import { DataGrid } from '@material-ui/data-grid';
import { Box } from '@material-ui/core';
import { Button } from '@material-ui/core';
import moment from 'moment';
import _ from 'lodash';

const dateFormat = (v) => {
  return moment(v.value).format('YYYY-MM-DD');
};

const columns = [
  { field: 'name', headerName: 'Name', width: 180, editable: true },
  { field: 'age', headerName: 'Age', type: 'number', width: 140, editable: true },
  { field: 'birthday', headerName: 'Birthday', type: 'date', width: 180, editable: true, valueFormatter: dateFormat },
  { field: 'isAdmin', headerName: 'Is admin?', type: 'boolean', width: 180, editable: true },
];

const data = [
  { id: 1, name: '1st', age:10 , birthday: '2020-01-01', isAdmin: false },
  { id: 2, name: '2nd', age:20 , birthday: '2020-02-02', isAdmin: true },
  { id: 3, name: '3rd', age:30 , birthday: '2020-03-03', isAdmin: false },
];

const DataGridTest = () => {
  const [rows, setRows] = React.useState(data);

  // データの確認
  const checkRows = () => console.log(rows);

  // セルの更新
  const changeCell = (v) => {
    let newValue = _.cloneDeep(rows); /* lodashでstateをディープコピー */
    let idx = rows.findIndex(d => d.id == v.id);  /* 該当データのindexを取得 */
    newValue[idx][v.field] = v.value;
    setRows(newValue)  /* 編集されたデータを置き換える */
  }

  return (
    <div style={{ width: '800px' }}>
      <Box component='div' sx={{ p: 2, textAlign: 'right' }}>
        <Button variant="contained" color='primary' onClick={checkRows}>確認</Button>
      </Box>
      <DataGrid
        columns={columns}
        rows={rows}
        autoHeight
        onCellEditCommit={changeCell}
      />
    </div>
  );
}
export default DataGridTest;
columnsの編集可能にしたい項目に「editable: true」を設定します。
「onCellEditCommit」でデータ更新完了時に「changeCell()」イベントを実行します。
まずはstateのrowsをnewValueにコピーします。
lodashを使ってディープコピーをおこなっています、Reactのstateはそのまま変更してはダメなようなので。
その後に該当のデータを上書きしてsetRowsでrowsに設定します。
確認ボタンを押せば現在のrowsの値が確認できます。

まとめ
データの更新は思ったより手間がかかります。
stateを直接いじるのに抵抗がない人はlodashを使わずに直接rowsを変更してもいいかもです。
DBでデータ管理するときは「更新」ボタンとかを作成してrowsをサーバに送って更新するとか。
onCellEditCommit時にサーバにデータを送って更新する手もあります。
その場合はセルの変更毎にサーバへの通信が発生しますが。
「Data Grid」は使うの面倒だな、もうちょっとどうにかできないだろうか。
「x-grid」のapiRefを使えばGridの状態や値を簡単に操作できるようなんですが、有料です。
無料の「Data Grid」を使うなら苦労しなさいってことなのかな、きっと有料機能への誘導だ!!
「Data Grid」でapiRefをhackして使えるようにする方法もあるようですが、できるだけホワイトで行きましょう。
ちなみに「onCellEditCommit」などの「on~」のprops内ならapiを使用できます。
とりあえず、追加・削除・更新ができるようになりました。
後はサーバ(DB)との連携だな。